8 tips for making ambush 'guerilla user testing' clip reel videos
Yesterday I posted my 10 tips for ambush 'guerilla user testing'. Once you've got some footage of people using your website, you need to find the best way to present that back to the business. I like to make a summary clip reel of the testing, and here are my 8 tips on putting your clip reel together...
1. Arrange your clips by theme
Your audience won't care particularly which order you spoke to the participants in, but they will want to understand the narrative of what you have learned. Arrange your clip reel by 'themes', not by test subject. This can be particularly effective if a series of users reinforce the same point over and over and over again.
2. Add caption slides
Punctuate the clips by using caption slides. I set the duration of them to be about 3 seconds including the fade in and fade out. To make sure they are going to appear in the right aspect ratio in your finished movie, you need to make them in the same aspect ratio (16:9 or 4:3) as your film footage. I use Photoshop, but you could also equally use PowerPoint or Keynote to make the slides. Insert them as still images in your movie. Don't forget to turn off the 'Ken Burns' effect if it is offered to you - nobody likes to try and read words that are moving around the screen. It may seem a bit like a throwback to the days of the silent movie, but I find they help the viewer of the clip reel understand the different segments better.
3. Repeat the question
In most modern offices, you'll find yourself presenting your findings and your clip reel video whilst half the audience are fiddling with their Blackberrys, iPhones, or are pricing up whether they can afford an iPad. That means that not all eyes will be on the screen all of the time, so make sure you include the question verbally after a caption slide. For example, after showing a slide with a caption like 'So, what are your plans to dominate the universe?', make sure the first clip includes you asking the subject "And...so...erm...Mr Dalek...what are your plans to dominate the universe?". It doesn't matter if you don't have accomplished TV presentation and interview skills - the important thing is to signal that the theme of the clips has changed.
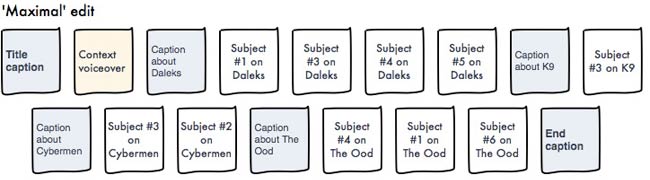
4. Don't make an epic
People won't want to sit through lots and lots of your footage, so don't make an epic. What I find useful is to make a 'maximal' cut of the footage. I go through each subject's footage, identifying all the clips which might be of use. Firstly this helps me identify all the possible themes, and at this point I group all of the clips around a particular theme.
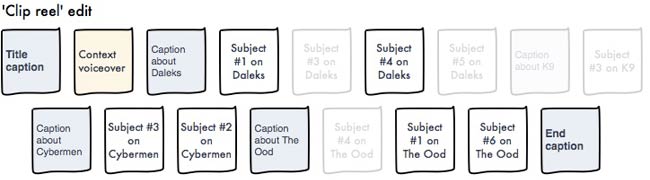
From there, I then make a shorter version, which is suitable for showing within the business.
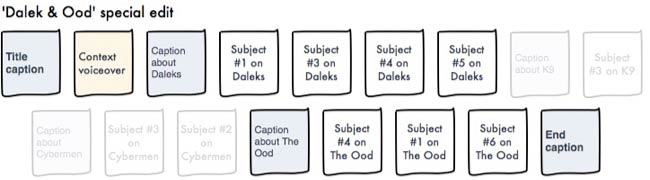
It also means that if I suddenly need to present my findings specifically to the "Dalek & Ood Steering Group", I can very quickly re-cut the 'maximal' version to just focus on those topics.
I generally aim to keep my clip reels just under the 4 minute mark. Any less, and it is difficult to convey the range of opinions you have captured, any more and you risk a lot of fidgeting at the back when you show the video.
5. Add a context voiceover at the beginning
If you don't set the context at the beginning of the clip reel, it will be difficult for your audience to know whether the people they are about to see have been specially recruited for the testing, or are expert users, or are existing fans of your site. Start your video with a short explanation of what you did and where you did it. I learnt everything I know from Charlie Brooker's guide to producing news reports, so I often use bland establishing shots of the venue, or me fiddling with my laptop, but you can equally just stare into the camera, or talk over a static title slide.
6. Place your logo carefully
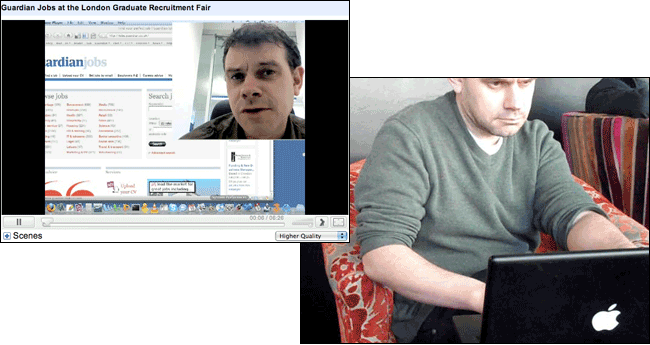
If you are going to be putting a logo on your caption slides, think about where the video player controls are going to appear. As you can see from this video of me demonstrating interactive features on newspaper Winter Olympics coverage, I make sure that the 'currybetdotnet' logo is big enough to be seen when shown at thumbnail player size, and (mostly) hovers above the play buttons.
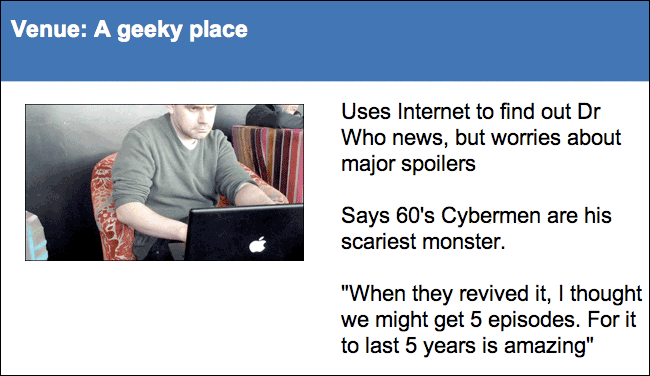
7. Make a presentation to go alongside the video
I like to also make a presentation summing up what people said during the testing. For each user I have a slide with a picture of them, and then a couple of key facts that I gleaned from them during the interview, There is no need to put demographic information or names. The latter isn't important, and the former should be obvious from the photo, but it can be useful to display the venue where you meet them. I like to put on the slide a couple of sentences that sum up what I filmed.
Why do it?
Well, some people will look at watching a video as taking an inordinate amount of time, but will happily flip through a few slides. It also works as a self-discipline exercise - boiling each film clip down to the one or two sentences they said that was valuable to the business is worthwhile in itself.
8. Add a credit caption at the end
You don't need to name the 'key grip', or have Hollywood style scrolling credits, but it is worth having a closing slide with your name and contact details. This is particularly useful if, as I do, you make the video available on your intranet, and you don't know who will be watching it, or when.
And finally...
I can't stress this enough. Ambush guerilla user testing is not the same as doing a controlled testing session where you specifically recruit people, and is totally unsuitable for producing numerical statistical results. You need to make that crystal clear when you present your findings back to the organisation. However, if you do it in the right venue, and ask the right questions, it can be a valuable tool in gathering some real user experiences of your webiste.